 Content
Block reading of data from the motion sensor NooLite PM111
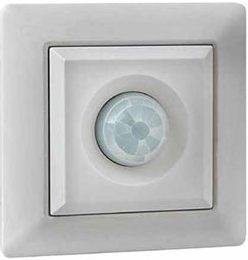

Block is used to read data from the wireless motion sensor Noolite PM111.
PM111 is a heat motion sensor, intended for use in the system nooLite. With the appearance of moving objects with temperature above ambient in the range of the sensor, it takes the radio command to enable (the output State of the block will appear 1). After a specified time after the cessation of movement in the area of the sensor, it sends the command off(output "State" block is 0). In addition, the sensor PM111 is provided with a photo sensor for measuring illumination, which allows to exclude the operation of the sensor in the daytime.
The sensitivity of the thermal sensor, the illuminance threshold and time of switching on the light when motion is regulated.
Notes
1.The thermal sensitivity of the sensor depends on the direction of movement, size, temperature and velocity of the object. The worst sensitivity is obtained by movement directly towards or away from the sensor. The best perpendicular to this direction.
2.When setting the maximum sensitivity of the thermal sensor possible false positives. If this is unacceptable then a little zagrabiti sensitivity thermal sensor controller "Sensitivity".
3.The adjustment range of the image sensor threshold ranges are approximate, because the light sensors have a large scatter.
4.The algorithm of the measurement light is introduced hysteresis, so disabling the thermal sensor occurs at a higher light level than its inclusion.
5.The range of the transmitter depends on the mutual orientation of the antennas of receiver and transmitter, obstacles between them and the freshness of the batteries of the sensor. With full batteries the range can be greatly reduced.
6.The discharge rate of the battery depends on the current settings and the overall lighting of the room. A longer lifetime will be in positions "a switch Time"–22min, "Luminosity" is low, Sensitivity is low, in a good light.
Appearance of the sensor.
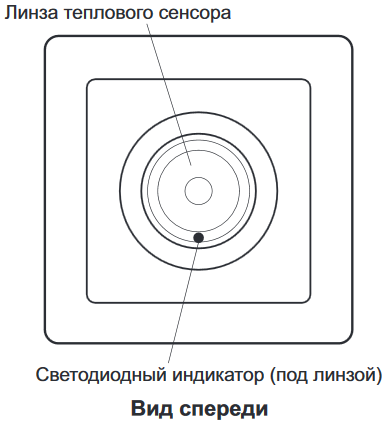
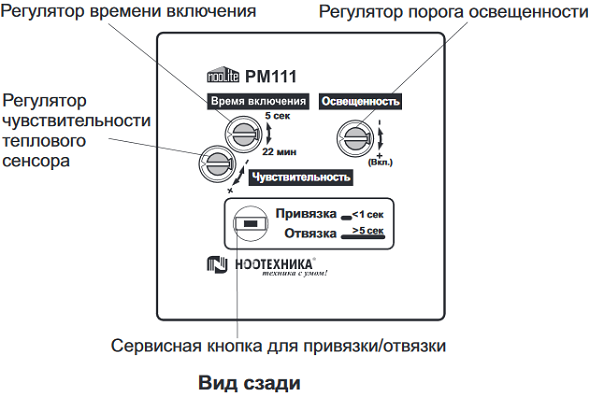
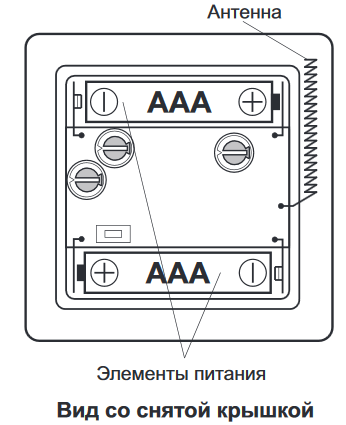
Before using you must install the batteries in the sensor. Their installation is performed with the removed back cover of the sensor according to the guidelines (+)/(-) on the case.
To validate the installation, you can by briefly pressing the service button should blink the led.
Closing the lid sensor, you must select one of three modes of operation and set if necessary the threshold.
The procedure of binding/unbinding
In order that the controller could accept commands from the sensor, you need to complete the pairing process.
For this receiver (MR1132) should be converted into binding mode (using block binding to the channel). After that you need short-term( <1 second) press the service button to send a command binding.
THE SENSOR
Modes of operation
If the lighting near the sensor above the regulator "Illumination", the sensor is in standby mode. While its current consumption is minimal (less than 1 µa), and thermal motion sensor is disabled.
When the illumination falls below a predetermined level, the sensor switches to standby mode.
The heat sensor is activated and the current consumption increases to 75 µa (approx.)
The transition back to the standby mode occurs at a slightly greater level of illumination to exclude multiple transitions there and back at sunset or dawn.
If the controller is "Illumination" is located near the high () position. ), the sensor
remains in standby mode whenever it's light.
Standby
This mode is activated automatically when illumination falls below the predetermined controller "Illumination" or force, if the controller is "Illumination" is set to "On".
In this mode, the heat sensor detects movement of warm objects within its range.
The size of the zone of action of the heat sensor can be set by the regulator "Sensitivity".
When motion is detected the sensor sends a radio command to the receiver (1 appears at the output of the State block).
When the motion stopped, the sensor counts the interval specified by the regulator, "on-Time" and passes the command off the light (at the output "State" block is 0).
If during the interval, again the movement is detected, the countdown starts again.
Team on and off are transmitted twice for reliability, with an interval of 2s.
After the filing of the first team the heat sensor is disabled for 3.5 seconds, it means that the sensor does not feel the movement of 3.5 seconds after commanded off.
INDICATION OF BATTERY DISCHARGE INDICATION
When it detects the battery is getting low the sensor reports that three short flashes of the led indicator, repeated every 8 seconds. Also the output "Batt" block appears 1.
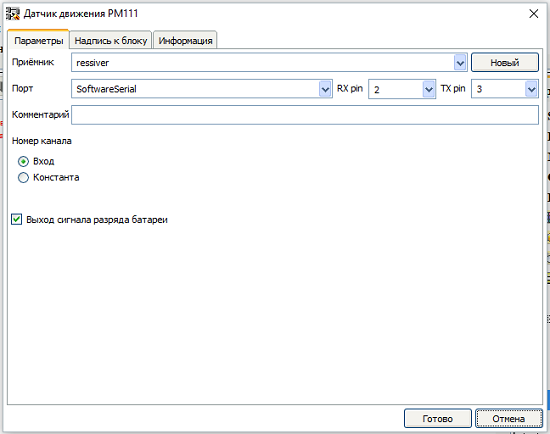
The unit is configured using the editor block


А как упаковать PZEM-004T в remotexy?
Спасибо, Альберт
ошибка в описании блока “Блок обнаружения изменения числа”
“Блок служит для обнаружения изменения числа подаваемого на вход “EN” . При изменении значении на выходе”Q” формируется импульс длительностью в один цикл программы. Для блока возможно задание зоны нечувствительности раздельно для каждого направления изменения числа. Эти параметры задаются в редакторе блока.”
вместо первого “EN” должно быть “Value”
что то не так с массивами.
скетч использовал данные из той же строки другого массива. менял названия (ставил не совпадающие цифры), удалял/ ставил блоки – (не копировал а притаскивал новый), проверял / менял настройки. есть 3 разных массива. заполненных. но берёт почему то из одного … созданного первым.
костыль – использование не повторяющихся номеров строк (индексов) . (помогает)
ардуино uno. версия FLP- актуал.
Странно,но у меня поменялись функциями блоки AND и OR
Добрый день. помогите с блоком шаговый мотор. при добавлении второго мотора ( кнопка новый) ничего не происходит.
Здравствуйте ! Спасибо огромное всем кто внес свой вклад в этот проект! Программа сделана интуитивно понятно и за месяц я дошел до коммуникаций но с протоколом Modbus остановился на ошибке 244 . Scada мастер, Uno слейв соединены через Max485. Задача кнопкой на Scada включать диод на Uno и на оборот. Подскажите пожалуйста возможные решения этой проблемы и еще в каких случаях назначать пин pe-de ?
С уважением Влад!
“Переменная (Тэг) в области памяти Holding Registors внешнего слейва опрашиваемого с помощью мастера на данном контролере.” – не хватает запятых?
как добавить свой блок? хочу поделится с часами для матрицы 8*8 )))))
Запись переменной на SD карту. Плата Arduino UNO.
“Data Logger Module Logging Recorder Shield V1.0 For Arduino UNO SD Card One”
Digital #13 – SPI clock
Digital #12 – SPI MISO
Digital #11 – SPI MOSI
Digital #10 – SD Card chip
При выборе CS подключения дает только Pin до 9. Нужно 10.
Что делать?
Добрый день!
В справке по блоку SVCM (отправка переменной через коммуникации) показаны активными два устройства: Arduino Ethernet Wiznet 5100 и ESP8266 WiFi Module. В версии программы 4.3.4 можно выбрать только Arduino Ethernet Wiznet 5100.
В обновлении 6.3.1 ESP8266 WiFi Module также недоступен для выбора.
Подскажите пожалуйста, может нужно что-то доустановить или настроить?
В PID регуляторе параметр “TIME” что означает?
Здравствуйте!
Как осуществить хранение данных во флэш-памяти (программе) вместо SRAM?
Добрый день.
Параметр “Time” – на этот вход подаётся время регулирования (в миллисекундах).” – так и не смог понять на что именно он влияет… Можно где то узнать что это за параметр?
Речь идет о ПИД регуляторе?
Добрый день! Мне требуется отправка по UART данных для MIDI протокола. Нашёл на просторах интернета готовый скетч, там отправка происходит вот таким образом
void noteOn(int chan, int note, int velocity) {
Serial.write( (0x90 | chan) );
Serial.write(note);
Serial.write(velocity);
}
Вопрос: плата Arduino Nano strong (т.е. плата и шилд сразу) при использовании блока матричная клавиатура подключение 2 пин основной 3,4,5,6,7 уже исполняющие
так вот при такой раскладке после прошивки на 4 пине появляется сигнал и ничего с этим не сделать если-же подключать так-же с 8 по 13 то на 10 он наоборот пропадает и ничем его не получить.
Flprog стоит 5.3.0 для 64 виндовс, это можно как-то решить т.к. проект готов и затык только в этом (не резать-же шлейф да сейчас такие шлейфы что :))) )
спасибо
Вопрос: плата Arduino Nano strong (т.е. плата и шилд сразу) при подключении 2 пин основной 3,4,5,6,7 уже исполняющие
так вот при такой раскладке после прошивки на 4 пине появляется сигнал и ничего с этим не сделать если-же подключать так-же с 8 по 13 то на 10 он наоборот пропадает и ничем его не получить.
Flprog стоит 5.3.0 для 64 виндовс, это можно как-то решить т.к. проект готов и затык только в этом (не резать-же шлейф да сейчас такие шлейфы что :))) )
спасибо
Приветствую! Подскажите пожалуйста, какова длина/(время) импульса на выходе блока “Установка события по часам реального времени” и минимальная длина/(время) импульса на входе для срабатывания блоков типа “Триггер”? Плата, Arduino UNO. (Осциллографа нет, а монитором COM порта эти величины с нужной точностью замерять затруднительно.) Или существует формула для этих расчетов?
Добрый день. А если в схеме нужен F Trigger,как быть?
Здравствуйте!
Как из пользовательского блока передать массив?
Здравствуйте подскажите пожалуйста разницу между блоками Bit Change и R Triger
Bit Change выдает импульс при переходе от 0 к 1 и при переходе от 1 к 0. Rtrig только при переходе от 0 к 1.
…имеется в виду, длины импульса и длины паузы.
Здравствуйте уважаемый Сергей Глушенко.
У меня такой вопрос.
Есть ли способ понизить скорость мне случайных чисел в данном блоке, как например в блоке “Generator”, с функцией “Несимметричный мультивибратор”…? А то данный блок “RANDOM”, меняет случайные числа с бешеной скоростью, из-за чего на дисплее не успеваешь разглядеть эти числа…
Здравствуйте, Сергей!
Прежде всего хочу поблагодарить Вас за прекрасную программу. Мне, как в пошлом,инженеру, очень комфортно создавать свой проект в Вашей среде.
Но у меня вопрос, на который не нашел ответа: Я создаю проект с участием нескольких контроллеров ESP8266 NodeMCU с OLED дисплеем. Очень не хватает такого модуля и модуля ESP32 WiFi LoRa с OLED дисплеем в предустановке.Мои контроллеры должны выполнять некоторые действия, и обмениваться между собой данными и информацией по WiFi в реальном времени. Причем, радиус действия WIFI сети каждого из модулей не должен влиять на передачу данных между конечными контроллерами. Поэтому контроллеры самонастраиваются, и записывают данные для входа всех контроллеров WIFI сети в память для постоянного коннекта по цепи (от начального до конечного). Вопрос: Можно ли в Вашей среде создать подобный алгоритм взаимодействия между контроллерами сети?
С уважением, Аркадий
Здравствуйте! Не могу понять в чём причина. В счётчике на уменьшение, при подключении переменных к входу R и выходу <L он не считает вниз, а если убрать с R то счёт идёт но, не совсем правильно(на ноль не сбрасывается). Подскажите, в чём может быть причина?
Здравствуйте подскажите как округлить показания датчика до десятых чтобы температура выводилась в виде 10,1 а не 10,12.
Заходишь в параметры блока конвертации строк, там есть параметр “Количество знаков после запятой”
Подскажите, почему счетчик не видит вход, хотя он добавлен ? Регулируемые бегущие огни.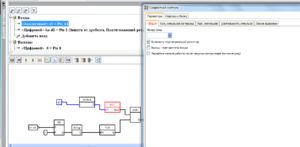
Добрый вечер!
Как определить и записать максимальное значение аналогового входа за минуту, и записать его на флешку?
Здравствуйте! Подскажите пожалуйста как создать двойное фазоимпульсное управление в char, для этой схемы.
Заранее огромное спасибо!
Добрый день. Подскажите пожалуйста как откорректировать датчик дс18б2хх есть отклонения 1-2 градуса в зависимости от температуры. Заранее спосибо.
Сложением или умножением в зависимости от характеристики отклонения
Здравствуйте, На сериал порт приходит сообщение 18 байт, мне нужно использовать несколько байт из него. Какой функцией выделить (извлечь) например 5-й байт? Или присвоить переменной значение 5-го байта из сообщения? Спасибо.
Здравствуйте! Подскажите пожалуйста как преобразовать String в char. Заранее огромное спасибо!
блоком “получить символ из строки”
Здравствуйте.
Скажите как сделать так что бы при достижении времени установленного в настройках блока на выходе установится высокий уровень не на 1 минуту, а до времени отключения будильник?
В данной версии блока будильника высокий сигнал на выходе пропадает через 1 минуту.
Будильник работает пока условие времени совпадает с будильником. Если необходимо более длительно время, то можно поставить блок TOF на выход Q
Здравствуйте!
В FLProg есть блок MCP23017.
Но ка только в «FLProg» начинает компилировать в «IDE» программа ругается и пишет, что нужны библиотеки MCP23x17.h и MCP23017.h. Без этой библиотеки блок не рабочий.
Где их можно скачать?
здравствуйте. есть ли модуль поддержки драйверов с управлением step-dir-enable? если нет то когда планируется?
Здравствуйте. Не могу запустить версию 5.00
—————————
flp.exe – Системная ошибка
—————————
Запуск программы невозможен, так как на компьютере отсутствует api-ms-win-crt-runtime-l1-1-0.dll. Попробуйте переустановить программу.
—————————
ОК
—————————
Что делать.
Установи Microsoft Visual C++ последний, и все заработает!!
Доброго времени суток! Скажите пожалуйста, какова максимальная частота счета для этого счетчика? При превышении какой частоты счета, следует выбирать “Скоростной счетчик”? Заранее спасибо.
Почему я невозможно соединить вход “R” с выходом “>L”?
Это баг 5 версии или что-то ещё?
Обратные связи запрещены
Доброго времени суток. Блок “умножение” FLProg 4.2.4 версия под Linux ( ось mint 19.1). умножает в 10 раз более установленного значения . Вставить скрин не получается.
Драйвер светодиодов MAX7219 в программе flProg версии 4.2.4 не работает. По крайней мере с семисегментными индикаторами. Попробовал в другой версии (2.5.1) – все работает корректно.