
 Content
 Custom block editor Professional Editor
 Basic settings
 Code
Code Branch "Code Element"
Branch "Code Element"
This branch is used to directly create a block code element.

Also, this branch is given the name of the code element and, if necessary, the condition for its insertion into the project code.
There are three options for selecting an insertion condition.
There are three options for selecting an insertion condition.

If you select The "no condition" option, the code is certainly inserted into the sketch if necessary.
In the other two cases, you must select the condition for inserting code into the sketch.
This is done using the "Select condition" button(2). this opens a window with a list of conditions available for this code element.
In the other two cases, you must select the condition for inserting code into the sketch.
This is done using the "Select condition" button(2). this opens a window with a list of conditions available for this code element.

With the selected condition, use the "Go to condition" button»(1), you can directly go to the settings branch of the selected condition.
If you select the "condition is true" option, the code will be inserted into the sketch only if the Boolean expression of the condition returns True. Accordingly, if the "condition is false" option is selected, the code will be inserted into the sketch only if the Boolean expression of the condition returns False.
The code editor toolbar depends on the location of this code element.
Consider the possible options.
General code of a multiblock, General code of a group of blocks, General code of a block - the Declare section.

With this arrangement of the code element in the toolbar, there are buttons "Insert UUID"(1), " Insert parameter tag»(2) and the check box "Prevent the compiler from seeing #Include"(3).
When you click on the "Insert UUID" button(1), the ID selection window opens.
When you click on the "Insert UUID" button(1), the ID selection window opens.

"A unique number" - "Unique number"each time this ID is selected, a unique number will be generated and inserted
into the code at the cursor location.
"Multiblock ID" - when this ID is selected, thetag is inserted into the code. When compiling the project, the multiblock ID will be inserted instead,
which will be the same in all the code included in this multiblock.
When you click on the "Insert parameter tag" button»(2) the tag selection window opens.
"Multiblock ID" - when this ID is selected, the
When you click on the "Insert parameter tag" button»(2) the tag selection window opens.

After selecting the from tag, it is inserted into the cursor position in the editor.

Check the box "Prevent the compiler from seeing a #Include»(3) present in the code element editor toolbar only when this element is located in the Declare section.
It is designed to control the project compiler. If it is not marked, the compiler will collect all the #Include lines from the Declare section of all instances of blocks and insert them into the sketch code in the place that it considers necessary,
obeying its own logic. Installing this check box tells the compiler that you can't touch the #Include line in this code element and you need to insert it into the sketch in the place where the block developer wrote it.
In some cases, this is necessary. For example, where the inclusion of one library should be made only after the inclusion of another, on which the first depends.
But in this case, it is possible to duplicate the connection of libraries. This is not terrible of course, but as they say – "not kosher".
General code of a multiblock, General code of a group of blocks, General code of a block – other sections.
General code of a multiblock, General code of a group of blocks, General code of a block – other sections.

With this arrangement of the code element in the toolbar, there are buttons "Insert UUID"(1), " Insert parameter tag»(2) and "Insert temporary variable tag"(3).
The operation of the "Insert UUID"(1) and "Insert parameter tag"(2) buttons was discussed above.
When you click "Insert a tag to a temporary variable»(3) the time variable type selection window opens.
The operation of the "Insert UUID"(1) and "Insert parameter tag"(2) buttons was discussed above.
When you click "Insert a tag to a temporary variable»(3) the time variable type selection window opens.

After selecting a tag, it is inserted into the editor at the cursor location.
Now consider what a temporary variable is. This is a variable that can be used by the block for intermediate calculations. When compiling a project, the compiler asks all blocks (both standard and custom) what type of temporary variable they need. After that, if necessary, it creates one variable of each requested type. That's just the name of this variable and will be inserted into the sketch when compiling instead of this tag.
Note that work with this variable must begin (write to it) and end within one section of the code. Because a block compiled after this block can write other values to this variable.
Example of using a temporary variable.
Output unit to display the value of a variable.
This block, depending on the type of the selected variable, converts the value of this variable to a String and then displays it on the screen. In this block, 4 code elements are created in the Loop section of the code of each instance at the place where the block is inserted.
The first three are conditional and are inserted into the code depending on the type of the selected variable.
In these code elements, the converted value of the selected variable is written to a temporary variable of type String.


In the fourth element of the code, we display the value of this time variable on the screen. This element is unconditional.

As a result of compilation, with the selected Boolean variable, we get the following code.
if (_gtv1)
{
_tempVariable_String = "Нет";
}
else {
_tempVariable_String = "Да"; }
if ((0))
{
myOLED.print(_tempVariable_String, 0, 0);
}
if (_gtv1)
{
_tempVariable_String = "Нет";
}
else {
_tempVariable_String = "Да"; }
if ((0))
{
myOLED.print(_tempVariable_String, 0, 0);
}
The code of each instance is the Declare section

With this arrangement of the code element in the toolbar, there are buttons "Insert UUID"(4), " Insert parameter tag»(1), " Insert login tag»(5), " Insert exit tag»(6) and the check box "Prevent the compiler from seeing #Include"(2).
Operation of the "Insert parameter tag" button»(1) and the box check "Prevent the compiler from seeing #Include"(2) we discussed above.
When you click the "Insert UUID" button (4) with this location of the code element, an extended ID selection window opens.
Operation of the "Insert parameter tag" button»(1) and the box check "Prevent the compiler from seeing #Include"(2) we discussed above.
When you click the "Insert UUID" button (4) with this location of the code element, an extended ID selection window opens.

A new item appeared in this window - "Instance ID".
When this option is selected, the tag is inserted into the cursor location in the code editor. When compiling a block in the project, the ID of a specific instance of the block is inserted instead.
Example
In the Declare section of each instance's code, we declare a variable.

And in the Loop section of each instance, at the place where the block is inserted, we write the value to it.

We insert two instances of this block into the project

As a result of compilation, we get the code:
Declare Section
int Var_176673836 ;
int Var_127258073 ;
Loop section where the first instance is inserted
Var_176673836 =200;
The Loop section is where the second instance is inserted.
Var_127258073 =200;
Declare Section
int Var_176673836 ;
int Var_127258073 ;
Loop section where the first instance is inserted
Var_176673836 =200;
The Loop section is where the second instance is inserted.
Var_127258073 =200;
When you click the "Insert input tag" buttons(5), "Insert output tag" (6) a window opens for selecting the appropriate tag from the list of inputs or outputs of this block.

After selecting the desired tag, it is inserted into the position of the cursor in the code editor.
Consider the operation of the login tag.
Unlike the old (Basic) custom block editor, this editor does not create variables for inputs. This is done to save the memory of the microcontroller. Instead of the input tag, a Boolean expression obtained from the input is inserted into the code, enclosed in parentheses. In most cases, this is the name of the output variable of the block connected to this input.
For example, consider this code

When you connect a constant to the input, we get the following result.

if ((50) ==20)
{
// Какой то код
}
If we feed the input, output of a block with an output variable, we get the following.
{
// Какой то код
}
If we feed the input, output of a block with an output variable, we get the following.

if (((_d18x2x1O)) ==20)
{
// Какой то код
}
But at the input, math is also possible, which is calculated on the fly to save memory
For example, with this scheme, we get a more complex version.
{
// Какой то код
}
But at the input, math is also possible, which is calculated on the fly to save memory
For example, with this scheme, we get a more complex version.

if ((((((_d18x2x1O))+(100))*(85.00))-(((_d18x2x1O))*(45L))) ==20)
{
// Какой то код
}
With this use of the block input, this is not critical. But it is possible that the input is used as a parameter of some function in the library. Not all libraries "like" when they are given an expression as a parameter.
For example, let's rewrite the block code.
{
// Какой то код
}
With this use of the block input, this is not critical. But it is possible that the input is used as a parameter of some function in the library. Not all libraries "like" when they are given an expression as a parameter.
For example, let's rewrite the block code.

Get the result
Out_238022926_164280164 = abstractCrazyFunction((((((_d18x2x1O))+(100))*(85.00))-(((_d18x2x1O))*(45L))));
Function abstractCrazyFunction most likely, he will swear when he gets this as a parameter: ((((((_d18x2x1O))+(100))*(85.00))-(((_d18x2x1O))*(45L))).
Therefore, when you are not sure that the use of the input will be correct for any data coming to the input, I recommend using this construction.

Then the compilation result will satisfy any function..
_tempVariable_int = (((((_d18x2x1O))+(100))*(85.00))-(((_d18x2x1O))*(45L)));
Out_238022926_164280164 = abstractCrazyFunction(_tempVariable_int);
Out_142227144_164280164 = abstractCrazyFunction1(_tempVariable_int);
The code of each block is the remaining sections.
_tempVariable_int = (((((_d18x2x1O))+(100))*(85.00))-(((_d18x2x1O))*(45L)));
Out_238022926_164280164 = abstractCrazyFunction(_tempVariable_int);
Out_142227144_164280164 = abstractCrazyFunction1(_tempVariable_int);
The code of each block is the remaining sections.

Here are the buttons that we discussed earlier.


Publication author
Comments: 15Publics: 389Registration: 04-02-2018
А как упаковать PZEM-004T в remotexy?
Спасибо, Альберт
ошибка в описании блока “Блок обнаружения изменения числа”
“Блок служит для обнаружения изменения числа подаваемого на вход “EN” . При изменении значении на выходе”Q” формируется импульс длительностью в один цикл программы. Для блока возможно задание зоны нечувствительности раздельно для каждого направления изменения числа. Эти параметры задаются в редакторе блока.”
вместо первого “EN” должно быть “Value”
что то не так с массивами.
скетч использовал данные из той же строки другого массива. менял названия (ставил не совпадающие цифры), удалял/ ставил блоки – (не копировал а притаскивал новый), проверял / менял настройки. есть 3 разных массива. заполненных. но берёт почему то из одного … созданного первым.
костыль – использование не повторяющихся номеров строк (индексов) . (помогает)
ардуино uno. версия FLP- актуал.
Странно,но у меня поменялись функциями блоки AND и OR
Добрый день. помогите с блоком шаговый мотор. при добавлении второго мотора ( кнопка новый) ничего не происходит.
Здравствуйте ! Спасибо огромное всем кто внес свой вклад в этот проект! Программа сделана интуитивно понятно и за месяц я дошел до коммуникаций но с протоколом Modbus остановился на ошибке 244 . Scada мастер, Uno слейв соединены через Max485. Задача кнопкой на Scada включать диод на Uno и на оборот. Подскажите пожалуйста возможные решения этой проблемы и еще в каких случаях назначать пин pe-de ?
С уважением Влад!
“Переменная (Тэг) в области памяти Holding Registors внешнего слейва опрашиваемого с помощью мастера на данном контролере.” – не хватает запятых?
как добавить свой блок? хочу поделится с часами для матрицы 8*8 )))))
Запись переменной на SD карту. Плата Arduino UNO.
“Data Logger Module Logging Recorder Shield V1.0 For Arduino UNO SD Card One”
Digital #13 – SPI clock
Digital #12 – SPI MISO
Digital #11 – SPI MOSI
Digital #10 – SD Card chip
При выборе CS подключения дает только Pin до 9. Нужно 10.
Что делать?
Добрый день!
В справке по блоку SVCM (отправка переменной через коммуникации) показаны активными два устройства: Arduino Ethernet Wiznet 5100 и ESP8266 WiFi Module. В версии программы 4.3.4 можно выбрать только Arduino Ethernet Wiznet 5100.
В обновлении 6.3.1 ESP8266 WiFi Module также недоступен для выбора.
Подскажите пожалуйста, может нужно что-то доустановить или настроить?
В PID регуляторе параметр “TIME” что означает?
Здравствуйте!
Как осуществить хранение данных во флэш-памяти (программе) вместо SRAM?
Добрый день.
Параметр “Time” – на этот вход подаётся время регулирования (в миллисекундах).” – так и не смог понять на что именно он влияет… Можно где то узнать что это за параметр?
Речь идет о ПИД регуляторе?
Добрый день! Мне требуется отправка по UART данных для MIDI протокола. Нашёл на просторах интернета готовый скетч, там отправка происходит вот таким образом
void noteOn(int chan, int note, int velocity) {
Serial.write( (0x90 | chan) );
Serial.write(note);
Serial.write(velocity);
}
Вопрос: плата Arduino Nano strong (т.е. плата и шилд сразу) при использовании блока матричная клавиатура подключение 2 пин основной 3,4,5,6,7 уже исполняющие
так вот при такой раскладке после прошивки на 4 пине появляется сигнал и ничего с этим не сделать если-же подключать так-же с 8 по 13 то на 10 он наоборот пропадает и ничем его не получить.
Flprog стоит 5.3.0 для 64 виндовс, это можно как-то решить т.к. проект готов и затык только в этом (не резать-же шлейф да сейчас такие шлейфы что :))) )
спасибо
Вопрос: плата Arduino Nano strong (т.е. плата и шилд сразу) при подключении 2 пин основной 3,4,5,6,7 уже исполняющие
так вот при такой раскладке после прошивки на 4 пине появляется сигнал и ничего с этим не сделать если-же подключать так-же с 8 по 13 то на 10 он наоборот пропадает и ничем его не получить.
Flprog стоит 5.3.0 для 64 виндовс, это можно как-то решить т.к. проект готов и затык только в этом (не резать-же шлейф да сейчас такие шлейфы что :))) )
спасибо
Приветствую! Подскажите пожалуйста, какова длина/(время) импульса на выходе блока “Установка события по часам реального времени” и минимальная длина/(время) импульса на входе для срабатывания блоков типа “Триггер”? Плата, Arduino UNO. (Осциллографа нет, а монитором COM порта эти величины с нужной точностью замерять затруднительно.) Или существует формула для этих расчетов?
Добрый день. А если в схеме нужен F Trigger,как быть?
Здравствуйте!
Как из пользовательского блока передать массив?
Здравствуйте подскажите пожалуйста разницу между блоками Bit Change и R Triger
Bit Change выдает импульс при переходе от 0 к 1 и при переходе от 1 к 0. Rtrig только при переходе от 0 к 1.
…имеется в виду, длины импульса и длины паузы.
Здравствуйте уважаемый Сергей Глушенко.
У меня такой вопрос.
Есть ли способ понизить скорость мне случайных чисел в данном блоке, как например в блоке “Generator”, с функцией “Несимметричный мультивибратор”…? А то данный блок “RANDOM”, меняет случайные числа с бешеной скоростью, из-за чего на дисплее не успеваешь разглядеть эти числа…
Здравствуйте, Сергей!
Прежде всего хочу поблагодарить Вас за прекрасную программу. Мне, как в пошлом,инженеру, очень комфортно создавать свой проект в Вашей среде.
Но у меня вопрос, на который не нашел ответа: Я создаю проект с участием нескольких контроллеров ESP8266 NodeMCU с OLED дисплеем. Очень не хватает такого модуля и модуля ESP32 WiFi LoRa с OLED дисплеем в предустановке.Мои контроллеры должны выполнять некоторые действия, и обмениваться между собой данными и информацией по WiFi в реальном времени. Причем, радиус действия WIFI сети каждого из модулей не должен влиять на передачу данных между конечными контроллерами. Поэтому контроллеры самонастраиваются, и записывают данные для входа всех контроллеров WIFI сети в память для постоянного коннекта по цепи (от начального до конечного). Вопрос: Можно ли в Вашей среде создать подобный алгоритм взаимодействия между контроллерами сети?
С уважением, Аркадий
Здравствуйте! Не могу понять в чём причина. В счётчике на уменьшение, при подключении переменных к входу R и выходу <L он не считает вниз, а если убрать с R то счёт идёт но, не совсем правильно(на ноль не сбрасывается). Подскажите, в чём может быть причина?
Здравствуйте подскажите как округлить показания датчика до десятых чтобы температура выводилась в виде 10,1 а не 10,12.
Заходишь в параметры блока конвертации строк, там есть параметр “Количество знаков после запятой”
Подскажите, почему счетчик не видит вход, хотя он добавлен ? Регулируемые бегущие огни.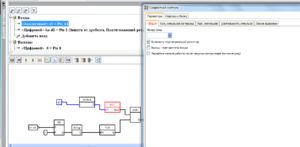
Добрый вечер!
Как определить и записать максимальное значение аналогового входа за минуту, и записать его на флешку?
Здравствуйте! Подскажите пожалуйста как создать двойное фазоимпульсное управление в char, для этой схемы.
Заранее огромное спасибо!
Добрый день. Подскажите пожалуйста как откорректировать датчик дс18б2хх есть отклонения 1-2 градуса в зависимости от температуры. Заранее спосибо.
Сложением или умножением в зависимости от характеристики отклонения
Здравствуйте, На сериал порт приходит сообщение 18 байт, мне нужно использовать несколько байт из него. Какой функцией выделить (извлечь) например 5-й байт? Или присвоить переменной значение 5-го байта из сообщения? Спасибо.
Здравствуйте! Подскажите пожалуйста как преобразовать String в char. Заранее огромное спасибо!
блоком “получить символ из строки”
Здравствуйте.
Скажите как сделать так что бы при достижении времени установленного в настройках блока на выходе установится высокий уровень не на 1 минуту, а до времени отключения будильник?
В данной версии блока будильника высокий сигнал на выходе пропадает через 1 минуту.
Будильник работает пока условие времени совпадает с будильником. Если необходимо более длительно время, то можно поставить блок TOF на выход Q
Здравствуйте!
В FLProg есть блок MCP23017.
Но ка только в «FLProg» начинает компилировать в «IDE» программа ругается и пишет, что нужны библиотеки MCP23x17.h и MCP23017.h. Без этой библиотеки блок не рабочий.
Где их можно скачать?
здравствуйте. есть ли модуль поддержки драйверов с управлением step-dir-enable? если нет то когда планируется?
Здравствуйте. Не могу запустить версию 5.00
—————————
flp.exe – Системная ошибка
—————————
Запуск программы невозможен, так как на компьютере отсутствует api-ms-win-crt-runtime-l1-1-0.dll. Попробуйте переустановить программу.
—————————
ОК
—————————
Что делать.
Установи Microsoft Visual C++ последний, и все заработает!!
Доброго времени суток! Скажите пожалуйста, какова максимальная частота счета для этого счетчика? При превышении какой частоты счета, следует выбирать “Скоростной счетчик”? Заранее спасибо.
Почему я невозможно соединить вход “R” с выходом “>L”?
Это баг 5 версии или что-то ещё?
Обратные связи запрещены
Доброго времени суток. Блок “умножение” FLProg 4.2.4 версия под Linux ( ось mint 19.1). умножает в 10 раз более установленного значения . Вставить скрин не получается.
Драйвер светодиодов MAX7219 в программе flProg версии 4.2.4 не работает. По крайней мере с семисегментными индикаторами. Попробовал в другой версии (2.5.1) – все работает корректно.